3 More Ways to Wear a Hair Fork -- For Long Hair


Hair forks are two-pronged hair sticks which can be very decorative and can hold up complicated buns for an entire day! I've made a bunch in the past week (five of which are pictured above) and during this time I've experimented with different ways of wearing the hair forks.

To learn how to do 5 different hairdos using the basic twist bun, please visit my blog post from earlier this week.

The following 3 hairdos are designed for those with longer hair-- at least shoulder bone length, I'd say. These styles are slightly more complex but still very easy to do. I recommend that those with long hair use large size hair forks-- 3 to 5 inch prongs. If you have especially thick hair, try a hair fork with wide prongs.

You can find all the hair forks I currently have in stock here, or send me an email at shealynnsfaerieshoppe {at} gmail.com for a custom piece.


Click "READ MORE" to see the picture and video tutorials:


(Hair forks pictured above and in the tutorial: Purple and Gold Twilight Hair Pin Fork and Midnight Blue Celtic Hair Fork).


LAZY WRAP BUN

1. Start by gathering your hair as if you were going to make a ponytail. Wherever you hold your hand is where the bun will be situated. This bun can be worn high or it can be worn as a chignon. 


2. Fold (don't twist) the hair up around the front of your non-dominant hand.


3. The next step is complex to explain, and I recommend you watch the video. Basically, after you have the hair folded around your hand, you take the remaining tail and coil it under your palm, around the "ponytail" part of the bun.


4. Here's a shot from the side to illustrate.


5. Insert the hair fork by sliding it along your fingers, through the big loop you made with the hair folded around your hand.


6. Finish inserting the hair stick. As always, the movement is not "push." You need to weave the fork by going back and forth, then wiggling up and down through the middle of the bun. Again, watching the video will be helpful.


______________________


(Pictured: Art Nouveau Blue Flower Copper Hair Fork)


FIGURE 8 BUN, AKA "INFINITY BUN"

1. Begin as if you were making an ordinary twist bun. Hold your hair as if you were making a ponytail, and twist the tail.


2. Instead of coiling around each previous coil, coil under the previous coils. 


4. Take the top coil and lift it up so that it separates from the bottom coil. Hold it up against your head.


5. Just another picture showing this process.


6. Secure with a hair fork!


Since the lighting in my video wasn't the best, here's a better picture of a figure 8 bun. The picture is from "Lady Long Locks" and was found here.


___________

TWIN TWIST BUN

Although this takes the longest to do (about one minute after you get some practice), I like it the most because it both looks fancy and feels incredibly secure. 

1. Make a half updo twist bun and temporarily secure it.

2. Make another twist bun directly below it. 

3. Don't use all the hair for the second twist bun. Instead, take the very end of the tail and coil it up around Bun #1 then back down around Bun #2. Watch the video if that didn't make sense. :)


4. Secure with a hair fork.


5. When securing with the hair fork, be sure that you weave through BOTH buns in an up-and-down motion, or else the hold will not be secure.


I especially love wearing hair forks inserted from the bottom. I don't know why but it feels a little more modern-elegant.

_______

P.S. Can I just say, making video tutorials can lead to some really bizzare screencaps... 

Anyway, if you do any of these hairstyles or come up with any other hairdos with my hair forks (or forks of your own), let me know in the comments or via email or facebook, etc! :)

How to Wear a Hair Fork (Part 1)


Last week, a friend of mine came over after work to go hiking at our house. Before we changed into workout clothes, I insisted she come into my studio and model for me "real quick."
I had just made a hair fork-- a decorative two-prong hair stick made out of copper-- and snagged a couple of pictures before we headed out. The next day, I shared the pictures on Tumblr and Facebook and uploaded it to my Etsy shoppe, and was greatly surprised by the response!

Over the past week I've made several more hair forks, all of which can be seen on my Etsy shop, or (if they sell), in my gallery of old items on Facebook.

I've come up with seven different hair styles using my hair forks! Below are five of them, along with video and picture tutorials. Tomorrow I'll post the final two!

When using a hair fork, remember that you weave them into your hair the same way that you weave in a hair stick or a hair fork: push backwards on the bun, switch to font, and then wiggle it up to the middle of the bun then switch to wiggle it down by your scalp. (If that made no sense, watch the first video!).

If you use a hair fork (whether mine or one you already have) and do these hairstyles or come up with another, feel free to share pictures in the comments or by emailing me! I might do a little gallery of the pictures! :)

(P.S. Scroll to the bottom for free shipping on any hair forks through 6.20.14!)


Click "READ MORE" to see 5 ways to wear a hair fork!

(Hair forks pictured above: Woodland Green Hair Fork Set and Purple and Gold Twilight Hair Fork. Hair fork used in the video: Purple and Gold Twilight Hair Fork).


The Twist Bun is the easiest hairstyle to do!

I started with an accent braid on the side, but you can do the bun without any braids at all, of course!

1. Hold your hair as if you were going to make a ponytail.

2. Twist your hair tightly.

3. Coil your hair around and tuck the ends under.

4. Push in the hair fork. Insert in the bun and push it out.

5. Weave the hair fork the other way and push it through the bun.

6. Ta-da! A finished twist braid! It will stay in all day!

________________________________


(Hair forks pictured above: Midnight Blue Celtic Knot Hair Fork and Woodland Green Hair Fork Set . Used in video: Woodland Green Hair Fork Set . Used in video on the variation hairstyle: Copper Celtic Knot Hair Fork.).


Braided Twist Bun

1. Make a low braid at the nape of your neck.

2. Coil like a twist bun and insert your hair fork.


3. Enjoy your deceptively fancy-looking bun! 
________________________________

Braided Twist Bun Variation: Side Braid

1. (Optional). Part your hair on the side. Starting at the part, twist your hair up in sections. The twist should wrap around the back of your head.


2. Make a side braid. In this case, I did a rope braid.


3. Coil the braid into a twist bun right by your ear.


4. Insert the hair stick! :)

________________________________


(Pictured above and used in video: Blue Spiral Hair Fork. Used in variation: Woodland Green Hair Fork Set.)


Half-up Hairstyle


Honestly this one doesn't need much of a tutorial. Just separate the top half of your hair and make a basic twist bun!
________________________________

Half-up Hairstyle Variation

1. This was made up on the spot, so it's a bit different. Start with a half-up twist bun. Braid the bottom part of your hair, at the nape of your neck OR at the side of the nape of your neck like I did.


2. Wrap the braid around the original bun.


3. Insert another hair fork, or secure the braid with a bobby pin.


(For those who are interested, you can get free shipping on your entire order from my etsy Shoppe if you include a hair fork in your order! Use this coupon code at checkout: HAIRFORKSHIPPING2014 It is good until June 20th, 2014).

7 Quick Takes Friday


I'm back home for the summer, and I'm working on Shealynn's Faerie Shoppe full time!

Between summer classes, volunteering, and wanting to put in a lot of time into jewelry design and artwork this summer, I wasn't looking forward to going back to my previous summer job. After talking to my parents about plans for my Shoppe and figuring how much it could hurt (or hopefully help!) me financially, I decided to jump into this thing headfirst. This is my summer of risk; this is my summer of spending my time getting to do the things I love.


Speaking of working on my Shoppe full time, my dad built me a workroom!!! THIS IS THE BEST GIFT EVER! Well, okay, not literally ever, as my parents have given me many wonderful gifts over the years, including, you know, being a part of this family ... but... this is so exciting you don't even understand. We partitioned off a corner of the separate garage, and I have a workbench and cabinet and shelves and office space and I AM SO EXCITED. This is especially nice to have my own space to work in, with natural light-- my sister and I are in a smaller bedroom now and the "back room" in the basement is awfully musty. I've barely left my workroom since we finished building it, guys!


I am moving from Artfire to Etsy, and in the process I am putting several items on sale! These sales still have one or two unsold pieces, so check them out. Both are for 50% off. More information on these sales are on my facebook page.

Please visit my new Etsy page, where all my items will be sold from now on.

Why am I leaving Artfire? Mostly because the monthly price is going up compared to the deal I had before. Artfire had a lot of things going for it-- they don't micromanage the way Etsy does-- but Etsy is far more well-known as an artisan marketplace and my stats have been much better there.


Hello again, blog! Yes, I finally plan to start blogging for real this time. Now that I don't have classes, homework, meetings, and events for approximately twelve hours every day, I have enough time to breathe. It's a little disheartening to see how much I've let my blog rust recently.


So.... Dad bought a 3D printer.

DAD BOUGHT A 3D PRINTER.

He's wanted one of these for years. My entire family is fascinated by the technology. We're going to have so much fun with this-- just as soon as we get it fully set up! Hopefully my siblings and I can all learn 3D modeling really, really quickly so we can start printing our own pieces. This technology is beyond amazing!


I can barely believe that my freshman year of college is over. So much has happened, and so much has changed in my life, that it is overwhelming to even think of discussing it without spending hours upon hours doing so. Life is like that; it's so full that no matter what you do, you can't fully share your experiences with anyone. Sometime I'd like to write deep words about this past year, but right now my life is so full of new things to do, and old friends to get back in touch with, that I won't butcher it by attempting to.

One thing that is very, very nice about being back home: being back home. I love my family. Being away from home, our local parish, and local groups of family friends is making me realize more and more what a blessing it is to be part of a big, eccentric, sarcastic, loving, geeky family. I also love living out "in the country" (even though we aren't far from town). Cities are great and all, but nothing beats taking a hike or bike ride through honeysuckle-ridden woods any time you want.


Today was a good work day, as evidenced by the fact that my fingertips are now very sore. I made an Eowyn inspired jewelry set, a statement necklace with vintage medals, and a replica of Queen Geuinevere's circlet in Merlin (currently I only have a picture of it on Instragram; I'm going to properly photograph it and upload it this weekend).

7 Quick Takes is a blog meme hosted at Conversion Diary.

Freshman Year -- 2D Design Art Dump!

Hey everyone! I have so much artwork from my freshman year that I'm going to have to break it up into a couple of posts. I'm pursuing a Graphic Design and Illustration major (it's a tough program to get in to and I won't know if I do until next spring) and freshman year was dedicated to the Foundations. These are the basic art classes that everyone in the art department has to take.

First semester I took 2D Design and Drawing I.

My 2D Design course was interesting... We had a textbook to learn the basics of art theory. I had honestly expected to learn more from it, considering that the only art class I had in the past was an informal one at the house of an artist who lives a few neighborhoods away. Being a bookworm pays off, though! 

The textbook and lectures fairly well bored me to death, and I'm far too critical of the way that art classes handle critiques. Critiques were three hour long ordeals in which we over-analyzed the movement, balance, repetition, etc, of abstract pieces of art. There was one kid who insisted that every single piece was somehow an abstract rendition of a city, another who said "it's crap" quite a lot, and another who was so nice to everyone that her critiques were more acclamation than critique. To be fair, I did learn a lot about ways of analyzing art and how to describe things that just look "off." 

However, I did come up with some pieces I was pretty excited about, and the professor was nice.


It might not look like much, but this drawing was really fun to do. It was one of those zen pieces, if you know what I mean. We had to incorporate patterns around random pieces of construction paper that we cut out. I love pen-work so spending hours doodling in class wasn't really a chore.


There is one thing I have to say about art classes-- it's weird to adjust to making art for someone else and oftentimes making things I really don't care about, yet still putting in all my best effort, work, and creativity.

Thankfully I've had some experience with that during these years of running my Shoppe (minus the "don't care about it" part because I always seem to care about jewelry-making). It's a strange mindset but I'm going to have to get used to it when I go into art and design as a career. There is a HUGE difference between personal art and work art, and I'm learning how to enjoy them both.


By the way, I hate construction paper so much now. We spent the first couple of weeks cutting out random shapes and gluing them in random ways and analyzing them. This is the only remotely interesting piece I made. One of the construction-paper pieces consisted of hand-cutting some perfect squares in three different sizes, and rearranging them until the professor approved it as "aesthetic"-- FOR SIX HOURS.
After this, we got to do some fun work.


One of the many things I've learned about art classes is that you really take out of them what you put in. It's not like math, science, or even (sometimes) the liberal arts, where you gain concrete knowledge as the end goal of the class, and there is a set amount of material to learn.

I've noticed that I get on the nerves of some fellow students because I'm always shooting for the stars, but I do like to challenge myself rather than settling for the bare minimum requirement for our assignments. 2D Design was a very basic course, but I did learn a lot simply from going overkill during the six hours a week I was in class.

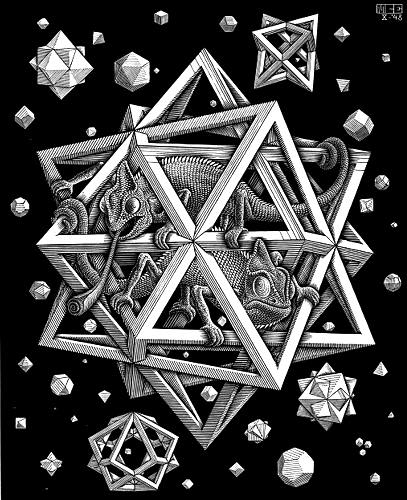
The picture above was from an assignment to use perspective points and horizon lines to create a picture that incorporated visual volume. We were also allowed only three colors (of which we could only make tints and shades).


The inspiration came from M.C. Escher's "Polyhedra" (shown at right). Basically I constructed a bunch of basic shapes and had them interlock in visual 3D space. The only thing that I don't like about this piece is that my professor told me that I had to paint each face of the cubes and triangles a solid color-- no shading based on internal shadows. She said this was because it was too advanced for our class and some of the students don't know how to do it without reference photos. "Save it for dedicated painting classes."

I kind of wish that art students were less competitive. I know that competition is a big motivator (for myself included), but there are some people who can't be genuinely happy for another person's talent. I sure know that I have a hard time fighting off jealously for those insanely gifted people in my classes, and I understand the feeling 100%. However, I dislike being apologetic for trying my best at the things I do best.


Anyway-- back to art!


The colors in this photograph came out way too orange but I can't seem to Photoshop it into the real-life colors. (Did I really just verb-ify "Photoshop"?).

This was a technique in color-mixing. The piece had to incorporate transparent objects, but every change in color due to overlapping objects had to be done by MIXING the paint colors-- no easy-peasey washes. It took forever. 

I couldn't come up with what design to do (abstract work requires too much thinking, darn it!), so I decided to paint a song instead. I don't think I've talked about it much on this blog, but I've recently discovered that I am not crazy. (Surprise! lol!). Ever since I can remember, I've associated colors and shapes (and sometimes textures and personalities) with different things like music, letters, and numbers. It's an actual psychological phenomenon called synesthesia.

Anyway, that is just proof that I am not crazy when I said I wanted to paint a song. I picked a cool one by Mannheim Steamroller-- below is the YouTube video. I painted snippets from the first thirty seconds or so.


(The full Fresh Aire song collection is on youtube here).

I wonder if any of you can listen to the song and see it in the painting, too? The painting is pretty meaningful to me because it's one of the ways I remember the song, but I imagine it's just a normal abstract piece to literally everyone else.


In this painting, we had to start with cutting out a small piece of a design from anything and build an entire painting off of that one little cut out, perfectly matching the colors. If you look closely at the the painting, you can see a small shiny circle smack in the middle of the red and blue in the middle. That's a cut out from a tea container.

Anyway, the design I came up with is kinda-sorta based off of Dancheong (a Korean art form I've blogged about before). Only it morphed into something else altogether.

That's all the interesting work from my 2D design class! Later this week I'll share artwork from my Drawing I class.

____________________

P.S. I have another flash sale going on on my Shoppe right now-- I'm moving everything from Artfire to Etsy, and I'd like to clear out some of my inventory while I make that switch!


This Woodland Elf Jewelry Set is 50% off right now.

(Note-- this one just sold as I was working on this post. I'm going to keep it in the post, though, because I like Frozen. :) It's a great movie!)

Want to stay in the loop and know every time I have a sale? Follow my Facebook page or Tumblr or Twitter!