DIY Altoids Watercolor Tin


Watercolors are a very handy paint because they are reusable once dry and you don't need to use a lot of paint to make a good painting. Plus, after a year of struggle, I'm starting to fall in love with watercolors and always like to have them handy.

But unless you are willing to shell out an exuberant amount of money on solid pan watercolors (or are willing to work with kiddie palettes seen in kindergartens around the world), watercolors aren't very portable.

Until you find an Altoids tin and a few hours for crafting. :)

The pictures are pretty self explanatory, so I'm not going to bore you with a bunch of rambling details and interesting tangents. Allons-y!


All you need is an Altoids tin, Mod Podge or another decoupage glue, paint sample cards (the kind with the glossy finish), and some watercolor tubes!


The height of the separators is up to you. 1 cm did the trick for me. It keeps the paint in but gives the tin some wriggle room so I can fit in mini paper, paper towel bits, pencil stubs, and mini paintbrushes, too.


At this point, I realized I needed more accordion-fold-paper-thingamabobbers, made a second one, and glued them together.


I then made some more separators so I could fit more colors into the tin. They are 1 cm wide and nestle into the accordion-fold paper..


Make sure that no paint can escape between the separators. Coat all the edges and corners with 2-3 thick layers of Mod Podge. Drying time between each layer will be exasperatingly long (about an hour) but it's worth it. For good measure, coat everything with Mod Podge just in case your paint card isn't glossy enough to be relatively waterproof.

As you can see from this picture, I hadn't properly sealed the separators and the red paint leaked.


These are colors that went into my tin. They don't have color names on them (they are from a set of watercolors my parents gave me when I was 10, and which I've only recently used. Notice how all the tubes are already breaking and paint is squishing and squashing all over the sides-- this is the perfect way to save old tubes of paint that would otherwise be hard to use!).


I wanted a wee container for holding water so that my kit could have everything I need for a tiny painting. After scavenging the house and testing out tiny plastic containers, I decided on the little plastic case that my brother's tiny scapular came in (far right).


I wanted to use the lid as a mixing palette, but didn't like the shiny gray, so I cut a plastic page separator from a notebook and glued it onto the lid.


There is still room to set some paper, paper towels, pencil stubs, and miniature paintbrushes on top of the watercolors.


Of course, it's not finished until you Mod Podge on a hand painted cover. And spelling watercolors the British way is a necessity. *nods gravely*

Overall, this is a fairly quick project that is absolutely free for people who have crafting materials hanging around. Well, the "curiously strong" mints aren't free, but you get to eat those so it's no biggie splurging a couple dollars. :)

If you attempt this project, please leave a comment! I'd love to check it out. :)


I made two tins, and the second was ultra miniature! I used one of those metal and plastic sleeves that allergy pills come in. The holes for the pills are the perfect size for a drop of paint. This one is so small that I can shove it in a pocket or tiny purse with no problem!

UPDATE:


After two years of dragging this tin around with me, it's still going strong! I brought it along with me to college, where it's come in very useful. I'll stash it in my backpack and work on sketchbook homework during my spare time-- or while eating a splurge of a breakfast ten minutes before a lecture class!

I highly recommend that anyone making a travel watercolor box invest in a waterbrush. These are paintbrushes that you can load with water, and they cost less than $7 at most stores.

Busy Ranting Dragons (Or, Hi! I'm back!)

When I was little, I always laughed when people told me to never complain about being bored. "Enjoy being a kid," they said. "Someday you'll want to be bored," they said.

"Clean your room if you're bored," Mom said.

Summer vacations with no neighbors your age and a tiny local library are a recipe for boredom. Never in my wildest dreams could nine-year-old-me imagine someone actually longing for hours with nothing to do and days that pass by in a dull monotony that is broken only by thrilling rides on the tree-swing and good books read on the hammock.

Now I really miss those days. For several months, I lived on caffinated tea and mechanical pencils. Now I have a glorious "nothing" going on all summer-- but I'm just as busy as before. Creativity is a heavy burden sometimes!

Two weeks ago, my family rented a cabin the the mountains of Colorado and had a GREAT vacation. I'll write about that later and share some of the senic photos (which I, of course, have not yet edited.) By the way, this is the reason for my long blog absence! Thanks to all the lovely people who guest posted! I hope you enjoyed their posts!


Then there was math. It's very tempting to share the long version, but the long version will easily morph out of reality and turn into a nightmarish dragon that snorts great gobs of rants between spurts of fire. I think you'd prefer the short version. It's a much friendlier specimen, with scales the color of a summer sun seen from indoors, and it only spurts rants a little bit.

I come from a family of engineers and scientists. My parents met in engineering school and well over 90% of relatives on both sides do something related to the left side of the brain. I'm the mutant who thinks with both sides of the brain-- I can do math, and I relish big science concepts, but the idea of doing that sort of thing for the rest of my life makes me want to shudder. Well, not the big science concepts. Those are cool. So are things like number theory and conic sections and trignometry and probability (at least sometimes!). The awful things are algebra, algebra, and more algebra. Alebgra does not like right-brained mutants.

This summer we had this brilliant plan of having me take a summer math class at a "nearby" community college (hour long round trip) so that I would have one less subject senior year. But the class that I tested into was crazy-- 6 credit hours in 8 weeks. That's nearly a full load, and I'd have to spend three hours each day of my summer sitting in a classroom listening to lectures on precalculus mathematics that I'd already done (the first part of the class was going to be review) and then just as much time each evening on homework. It doesn't help that if algebra is involved, my pace is quite slow. It's so gosh darn hard to keep the big picture in mind when you're caught up in number acrobatics.

After the first week, I knew that I would have to stop everything-- big art projects, summer get-togethers, regular posting on my blog, even taekwando-- in order to fit in this class, the rest of my Junior year, and Ink and Fairydust. My parents were surprisingly (to me, at least) supportive and even encouraging of my decision to drop the class. I did feel like a complete failure for a few days, though. Math has always been a sore subject for me, and I've always felt a little guilty that I don't enjoy it. I can do it, I can pull A's, but it's not something to look forward to.

It's definitely a struggle for me to have to choose what to spend my time on. God has blessed me with many talents and perhaps too much brain for my own good. There is so much that I want to do. So much that I could do, if only I had the time and energy to learn it all. What you see on my blog is only a minuscule portion of my interests.

This summer I am going to really focus on my art. I'll try to make two or three large pieces that would be worthy of a portfolio. (I have to apply to colleges in the fall!) I also want to hang out with friends, learn some new unicycle tricks, get in shape, have a good time with my family... That and finish Junior year and do the math book Dad gave me so that I can get speedier at algebra. Because apparently that's a really big deal, even for someone wanting to go into graphic design.

This is likely the last real summer vacation of my life and I can't believe how many projects I have planned for it! I also can't believe that it's half gone before I've begun. I had had an idea for teaching an art class for local kids, and I really, really hope it's not too late to get the ball rolling. Heehee, I need gas money, and I really do love teaching. And art. And NO, I have no plans of being a school art teacher, I want to do graphic design or animation.

In case you can't tell, I'm overwhelmed and a little unsure about things and I just put you through a rant. Here's something that's not about school or how busy I am. An oil painting!

Your Little Princess Costume Design

Today I would like to introduce you to two wonderful young women who I have the honor of knowing... Elizabeth and Amanda!

Elizabeth
Amanda


They recently began a business designing and sewing high-quality, custom costumes for children. They've put a lot of time and love into "Your Little Princess Costume Design" and I wanted to share it with you!

I got to hear about YLP before it was officially announced, when asked to turn Elizabeth's drawing into a logo. Sometimes it's awesome having computer art skills. You get to hear about cool things early. ;)


I decided to interview Elizabeth and Amanda-- read on! My part of the conversation is in bold.
 

Let's begin with the basics: What is "Your Little Princess" and where did you get the idea to start it?

Elizabeth: "Your Little Princess Costume Design" (hereafter to be referred to as YLP) is a business specializing in making custom keepsake costumes for little girls. I'd wanted to start a costume business for many years, but adult costumes get very pricey, making it harder to find customers. Thanks to my younger cousins and the kids I've nannied, I've gotten some chances in recent years to make costumes for kids and have found that I really like it! One day my dad and I were talking, and everything just sort of came together.


What kinds of costumes do you make?

Amanda: Currently we are offering costumes ranging in style from ancient Greece, to fantasy inspired, to Regency to Victorian.  My personal favorite is the "Rose" costume - a beautiful southern belle style.  We aren't designing any boy's costumes, though that is an idea we have tucked away for the future! 


(puruse their full design gallery here)

When did you first fall in love with fashion/costuming?

Elizabeth: When I was a year old my dad made me into a Chiquita banana for halloween. Everything since then is just allowing me to have pretty dresses and never have to be a banana again.
That's hilarious, Elizabeth! I'm sure you were a cute little banana, though. What about you, Amanda?
Amanda: Well, I must confess that I've done very little sewing myself, at least, very little compared to Elizabeth! So costuming is something I tend to regard with that wide-eyed and awed sense of "Gosh, this is amazing!"

What are some of your biggest costume inspirations?

Elizabeth: Tudor England has always been a huge costume inspiration for me. English fashion in general is a love of mine, and I also find ideas in fantasy, ballet, theater - you name it! Pre-Raphaelite paintings are also great, I keep four big posters up in my room for inspiration in all art forms.


(two of Elizabeth's many costumes that she shares on her blog)


How did you meet each other?

Amanda: Well, we first got to know each other online through the Fairy Tale Novels Forum, which was started by Elizabeth for fans of Regina Doman's books.  We became adopted sisters and very close friends.  We officially met in person almost two years ago at ReginaCon, a fan gathering for members of the FTN forum.

Elizabeth: Somehow we have one of those rare friendships where we can talk equally well online or in person, and it's been marvelous. And even though there are a couple of years in between us, we just get along so well! One of my favorite memories was last year when Amanda and I got up at 4:00am to watch the Royal Wedding and chatted with each other the whole time, commenting on every last detail of every dress, hat, and uniform.

Share a bit about yourself... what makes you tick? What do you do outside of Your Little Princess?

Amanda: Outside of YLP I enjoy reading - lots and lots of reading!  I enjoy books of all shapes and sizes, but I have a fondness for historical novels, love stories and fantasy.  I play the piano with some current favorite pieces being from my Grand Irish Songbook and the songs from "Wicked".  I love photography and taking pictures - especially dressing up with my sisters for photoshoots!  I also have a thing for marketing, so I've been helping out my dad with some of his marketing business projects.  The outdoors is a wonderful place, and it's fun to go exploring on a walk or a bike ride or a long hike with my family or my boyfriend when he visits.

Elizabeth: I'm also a reader (my books are taking over the house!), an artist and a professional writer. In my free time (what's that again?) I love hanging with friends and being creative with my roleplay group.

What do each of you do for YLP?

Amanda: I take care of the marketing and finance end of things.  So far I've been working on building our website - which hopefully should be ready to launch soon! - a facebook page, tumblr blog, and a twitter and pinterest when I get around to it.  It'll be my job to promote the business and generate customers, as well as then keep track of the money that said customers give us ;-)
I certainly know how much work goes into the marketing end! You've done a great job so far. I take it that Elizabeth does the actual sewing. How much do you two collaborate in the design process?
Amanda: Yes, Elizabeth does the actual sewing, as well as the designing of the costumes and working with the customer to give them the design and elements that they want.  We really didn't collaborate in the design process, other than her showing me the sketches when she finished with them so I could come up with the costume names.

What is your dream costume to design/sew/wear?

Elizabeth: C'mon Shaylynn, I can't pick just one!
Amanda: hehe... does a wedding dress count? If not... oh gosh... there is a lot to choose from.
Heehee, it's so hard to pick favorites, but I'm going to be difficult and make you choose one, off the top of your head. If there were no time or money budgets to contend with, what would your first project be?
Amanda: Okay, I'd say wedding dress, but since I'm not getting married any  time soon and I already told Elizabeth that I want her to design my dress when I do get married - I'm going to go with Eowyn's shieldmaiden dress.  I just love that.  And then probably something from Downton Abbey.
Elizabeth: This might surprise you, but right now I really want to make the current costume of the X-Men member, Rogue. It's kind of detailed and I'd love to do proper fabrics and stuff. Except, wait, I just got the fabric for $7 so that doesn't work... um... I also want to make an old-fashioned corset (or maybe two because the Victorian silhouette is different than the Elizabethan one).


(YLP's first two costumes)

And now that you are completely hooked, here are some links (their website is in progress):
Elizabeth's costuming blog, with YLP behind-the-scenes

Photoshoot Faves

Over the past year, I have really been getting into photography. It's all my jewelry's fault... I never took many photos until I started photographing my jewelry. I've already shared some of my recent photography adventures (the book page skirt, Elven photoshoot, etc.) but some of my favorite shots have been from personal photoshoots I did with friends and family. I thought I'd share a couple of cool pictures from them.

I shoot with a Lumix Panasonic that used to belong to my grandparents. (By the way, my Papa takes awesome photos... someday I want to learn to use a camera as well as he does!) This camera ROCKS. I can't do fancy things like depth of field or effects from different apeture settings and whatnot, but it does pretty much everything I really need it to.


This one is straight out of the camera, no editing except the watermark. :)


My brothers. Probably the only pictures of them you'll ever see on the blog; they don't like having photos taken.

But when Mom and Dad force them to be in one of my photoshoots, they sure do go all out to make sure that I get lots of candids.


Me and my sis.


My littlest siblings were all dressed up and taking cute pictures, when we were interrupted by...


The Caped Unicyclist

Book Party {Guest Post}

Hi! I'm Rosemary and today I'm doing a little guest post about a party I planned for my little sister. Since some books were destroyed in the process, I thought it would be ideal for a guest post on Shaylynn's blog!

My little sister was having trouble choosing a theme for her 12th birthday party and I suggested she choose one of her favorite things–books! She loved the idea and we had a ton of fun planning it together. AND, her friends loved it too! So here are some ideas and things that we did, and hopefully you can use them to throw your own book themed bash! :)


(Forgive the lack of nice photos! They're all taken on different cameras by different people. I wasn't really planning on doing anything with them so they're not the nicest!)

Invitations:

Here is where the book destruction begins! These invitations are very simple, but perfect for the theme. All you need is an old book, paper, a card, and some kind of adhesive. I didn't take any photos before we gave them out so these photos are of a quick recreation.


1. Get out your old paperbacks! I knew the moment we decided on the theme that old book pages would be the star of the party. I got out some of my 10¢ paperbacks (sometimes it pays to be a book hoarder) and got snipping.

2. Take a card or fold some pretty cardstock into a card (great way to follow a color theme). Write whatever you'd like on the front, as long as it resembles a title (feel free to print things from the computer or stamp them for a more professional look).

3. Cut out some rectangles from the old book to be the "pages." Adhere on to each side of the book.

4. Cut out a smaller rectangle, write your invitation info on it, and adhere to the center of the "page" (I like it to be slightly framed by the words). You have an invitation that looks like the book!


Decor:

Three words: DESTROY MORE BOOKS.The first thing we knew we needed was a bunting (we're Pinterest addicts, what can I say). We experimented with different shapes and decided we liked hearts the best. The rest was very simple. For the bunting we made a small cut on the each side of the heart and then threaded yarn through them all. Like I said, very simple, but you will probably spend a long time cutting out hearts! We made a bunting for the entrance and the dining room, and some little streamers to hang from the chandelier.  You could carry the decor father than we did and set up old pretty books around the room or make some kind of centerpiece!


Refreshments:

We needed a couple book themed ones, of course! Some of our ideas were colored Goldfish (for One Fish, Two Fish, Red Fish, Blue Fish), "Ambrosia squares" (from Percy Jackson), and of course the Harry Potter series is never ending supply of treats to try to recreate! We were also lucky enough to find a package of Turkish Delight at TJ Maxx! No need to mention what book that is from! :)
I attempted to make a cake that looked like a book, but I was not satisfied with my efforts. If you're good with fondant, I think little fondant books on top of cupcakes would be adorable!


Games:

The first game we planned was to have people guess what book characters everyone else was. I wish I could show you a photo of all the girls in their amazing costumes! We had Harry Potter characters, Hunger Games characters, and even someone from Les Miserables! (I was Mary Lennox from The Secret Garden.) If your characters are too obscure, feel free to skip this game!

I wanted to do a classic "pin the blank on the blank" game so I made this one kind of sneakily to surprise my little sister. Pin the Title on Bella's Book! I actually drew my sister, but you can feel free to draw a generic person, a character, a stick figure, or even use a photo! Just have them holding a book! I then cut out some rectangles with the titles of Bella's favorite books on them. You probably already know how to play: the player is blindfolded, handed a "tail" with a piece of tape attached to it, spun a little bit, and then tried to "pin" the title onto the front of the book. I was thought it was fun waiting to see what Bella would be reading! :)


"The Line game" is one we learned in an acting group and play at almost every gathering. You and a partner have to act out a dramatic scene (you're sinking on the Titanic, you're trapped in a haunted house, etc.) but you both have a little piece of paper with a random line on it that you must read and incorporate into the scene at some point. It can be hilarious! To make this part of the book theme we used lines from our favorite books ("For Narnia! And for Aslan!" "There's a goat in the shower!").
It takes awhile to think of enough quotes to play for a long time, so start making the list a couple days before. The cut them all into separate slips, fold them, and put them in a box. Have everyone pair up (or split into groups of threes). When a pair is ready to play, give them their lines and their scenario (those can also be thought up ahead of time and can be from books!). Watch the story that unfolds!


This we made up specifically for the party! Everyone gets to design a book cover, and then the other player choose whose they like best by "buying" the book with play money!

You'll need drawing utensils (markers, crayons, pencils), small sheets of paper (we used normal 9x11 printer paper cut in half), play money for everyone (just steal it from Monopoly), a timer, and a list of goofy titles (Pippy and the Mountain Goat Choir, The Unexpected Cow, etc. It's good to think of these ahead of time!).

Make sure to tell all the players that it's about creativity, not how well you can draw. Encourage them to interpret the title anyway they want!

Each person gets a piece of paper and then everyone is told the title. Everyone has 5 minutes  to draw a cover. When the timer goes off they each show their cover. Then the players walk around with their play money and "buy" the cover (or covers if you don't want to be too competitive) they like best! The player with the most money at the end of the round and/or game wins! You can play this as many times as you want/have titles for!


Another thing that would be fun (and you can use up more old book pages on!) is "newspaper blackout poetry." You take a page and black out all but the words you want to keep, making a really interesting piece of art (you can look here for some examples: http://newspaperblackout.com/).


Treat bags:

According to my little sister, treat bags are the best part of every party. She has very high standards for them, so it's a big deal that she was happy with these!

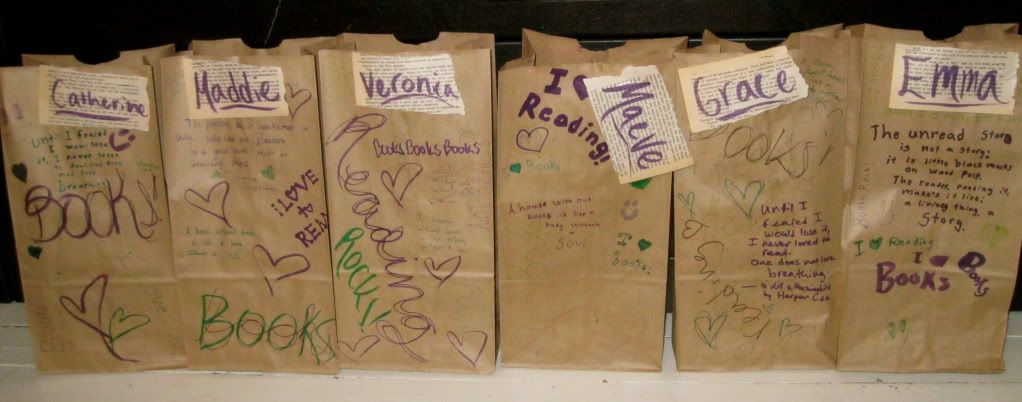
We decorated each bag with quotes about reading and wrote the guest's name on a piece of book-page. Inside the treat bag is:


A packet of bookworms

We bought a big bag of sour gummy worms and split them into small ziploc snack bags. Then we took a piece of paper, folded it over the top, stapled it, and labeled it Bookworms! It's cuter AND cheaper than buying a pack of separately packaged gummy worms.


Harry Potter lollipops

We were lucky enough to come across a bag of fizzy lollipops and immediately thought "Acid pops!" They're mentioned briefly in Harry Potter, but it was enough for us! We copied the Honeydukes colors and stapled labels onto the stick. You could also print out the Honeydukes logo from the computer and use that!


Wonka candies

Available at almost any store and book related by their very nature!

Little notebooks

We bought a pack of mini composition notebooks and then decorated them with pretty scrapbooking papers and little book page hearts!

Each treat bag also contained two books! We got a bunch of gently used books at a used book store and matched them up to who we thought would like them best.

If you want to add more, there are lots of ways to recreate book themed candy! :)

I'll end with some quick tips for using old book pages:

1. If you don't have any old paperbacks don't fret, they're easy to find. Simply go to your nearest used bookstore or thrift store and find the paperbacks and/or clearance section. You should be able to get a couple paperback classics for under a dollar. If you must you can use a dictionary.
2. It doesn't matter much what the book is about or what the page says, seeing as no one will be able to read very much of it. It can be fun to use a book everyone will recognize (Pride & Prejudice or Narnia for example). Or you can make the words almost completely decorative by using something more obscure (I used Pride & Prejudice for the invites and Villette for the decorations).
3. Keep an eye out for awkwardness. As long as your book is family friendly you shouldn't have to worry too much, but keep an eye out for awkward formations of words and stuff. It doesn't matter so much for the bunting, but for the little notebooks you definitely want to be aware of what the hearts say. . . . Fine! If you really need an example I'll give you one. I was showing my mom the little notebooks and she laughed and pointed out that one of the hearts said "she scratched" and the line below said "her seat." See, nothing scarring or anything, just awkward. I put new hearts over top that one and was more careful to read what sentences they formed. :)

Hope this little post inspired you to throw your own book-themed party! :)